We are often asked by our clients to setup security firewalls and networking products in a lab environment using popular emulators like EVE-NG or GNS3 etc. It is always not easy to find ways to emulate different security network products, but we are able to find workarounds to setup them in our lab environment. Network emulation requires virtual devices like routers, switches, and PCs to replicate in real time environment and analyse traffic coming through the devices. Vendors provides access to these images in different ways like ISO images, free software downloads or get access to their licensed versions. We have successfully worked on the following products: Sophos XG, Snort IDS & IPS, Juniper SRX Next Gen, Check Point, Symantec (SEPM), Symantec EDR, Trend Micro (Deep Security Manager), McAfee ePO, Cisco Umbrella Reporting, Cisco Firepower, Cisco ASA, Fortinet, Cisco Meraki, WatchGuard, Microsoft DHCP, Suricata and so on.
Some of the common use cases we have used these emulations in our lab for our clients include:
- Use this setup in a lab environment to create real time traffic and attacks for testing purpose and analyze various logs such as System event log, Anti-Malware event, Application Control event, Firewall event log, Integrity Monitoring log event, Intrusion Prevention event log, Log Inspection event, Web Reputation event. These logs can be ingested into various Log Management platforms like Splunk, Sumo Logic, Graylog, LogRhythm and so on in Syslog, CEF and JSON formats for further investigation
- Run the OS that emulates real behaviour of network hardware to create and test Threat Hunting rules like SIGMA and Vulnerabilities using OVAL
- Simulate a network with several network devices for Penetration testing
- Developing integrations with different TIP, SOAR and SIEM platforms. This will help us to demonstrate proof of concept (POC) and use cases that are possible with an integration or analyze the feasibility of an integration with a TIP, SOAR and SIEM platform
In this blog, we will demonstrate the first use case using Check Point Firewall as an example. This blog will cover the following:
- Deployment/Installing and Setting up Check Point firewall on a server
- Configuring and setting up a test network, using Check Point management server
- Creating policies, generating traffic and capturing Logs
- Finally Parsing and mapping Logs
1. Deployment/Installing and Setting up Check Point firewall on a server
- 1.1. Download the ISO Images – for Check Point, routers, switches, and virtual PCs and have access to a VMware Workstation and WinSCP (SFTP Client). Check Point ISO file can be downloaded from the website You can find several places to download the images for Routers, Switches and Virtual PCs, make sure that the images you download are compatible with Check Point
- 1.2. Install EVE-NG in a VMware workstation To setup Lab Environment for Check Point, you need to have access to a VMware Workstation, EVE-NG (Network Emulator) and WinSCP (SFTP Client). EVE-NG can be downloaded here and WinSCP can be downloaded here.
- 1.2.1. Network Emulator (EVE-NG) will be installed in VMware workstation and the Network settings will be set to Bridged mode to obtain IP address from DHCP
- 1.2.2. EVE-NG provides a Web UI which can be used to create your test environment with different routers, switches and Virtual PC’s
- 1.3. Setup Check Point firewall
- 1.3.1. Install WinSCP which is used to copy file between a local computer and to the VMware Workstation where we installed EVE-NG in the previous step using FTP, SFTP
- 1.3.2. Establish Connection between WinSCP and EVE-NG by entering EVE-NG IP address, Port, Username and Password
- 1.3.3. Create a Directory in EVE-NG and give permissions to transfer the files
- 1.3.4. Copy the ISO images to Directory in EVE-NG from local system
- 1.3.5. Once Images are copied to EVE-NG, Right click in the Web UI and you will be presented with an option to select all these images in Node
- 1.3.6. The next step is to select Management cloud from the network which will provide internet access to all the images (Bridges, Switch, Check Point Firewall, Virtual PC’s etc.)
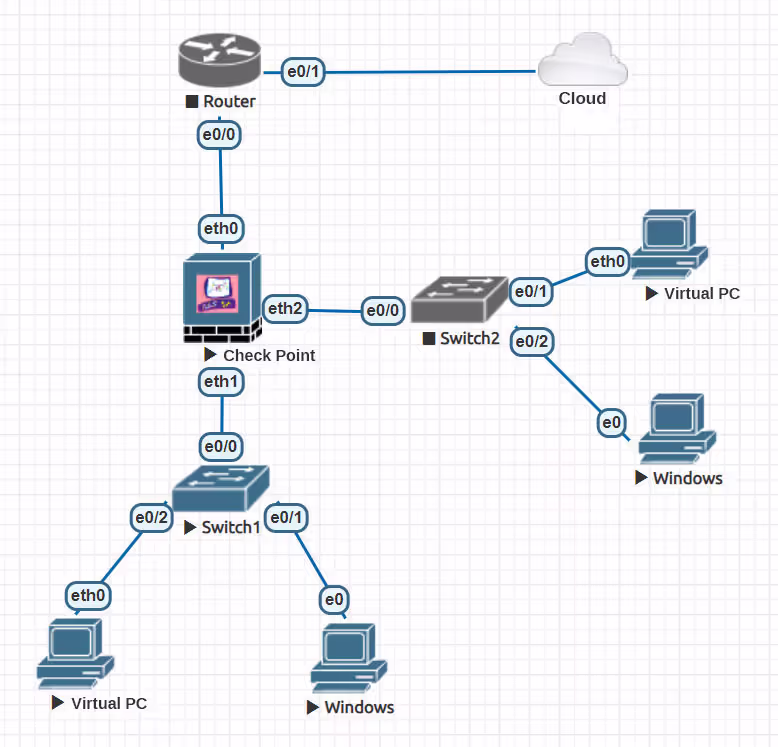
- 1.4. Configure network topology In this step, we simulate a typical network which contains Firewall, routers, switches, Virtual PC’s to generate traffic and create logs.
- 1.4.1. Using Web UI, we will now connect all the images to create test environment
- 1.4.2. Images will be enabled and Connected to Management Cloud for Internet Access
- 1.4.3. Multiple Virtual PC’s (VPC) and Windows system image can be connected to Check Point firewall through Layer 2 Switches (SW, SW2)
Given below is a test network topology which contains the following devices: two Switches SW1 and SW2, PCs (Virtual PC’s and Windows) and a router R1. PCs are used to run commands like ping to generate traffic.
2. Configuring and setting up a test network, using Check Point management server
2.1. Initial Check Point Image Configurations
Firewall will be configured with Static IP address, DNS, and User Credentials to access Web-UI. For the purpose of this BLOG, we chose Standalone Deployment where both Security Management and Security Gateway will be installed in same machine.
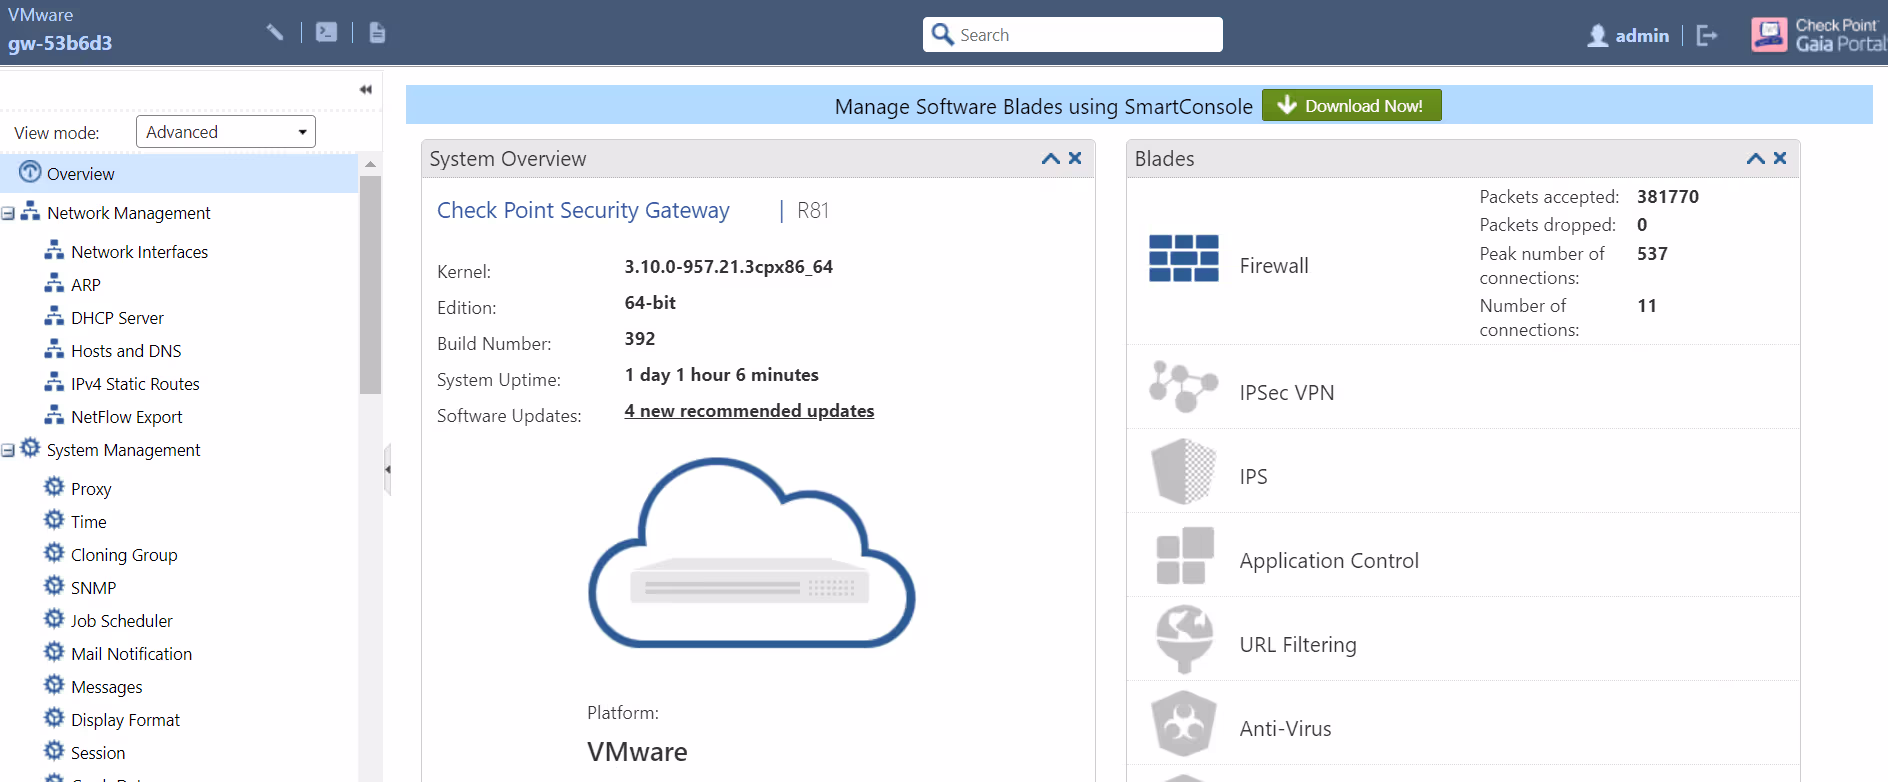
2.2. Configuring Check Point Gaia Portal
Gaia Portal is an advanced, web-based interface for Gaia platform configuration. Almost all system configuration tasks can be done through this interface.
- 2.2.1. Check Point Gaia portal can be accessed by using Static IP address configured in the Firewall Image
- 2.2.2. Add Static route in Check Point Network Management with Next hop as Default
- 2.2.3. Check Point Interfaces will be Enabled and assigned Security Zones
- 2.2.4. Virtual PC’s can be connected to Check Point Server using Switches and configured to access all the Internal and External Zones
Given below is a screen capture of Gaia Portal to accomplish the system configuration that are listed above.
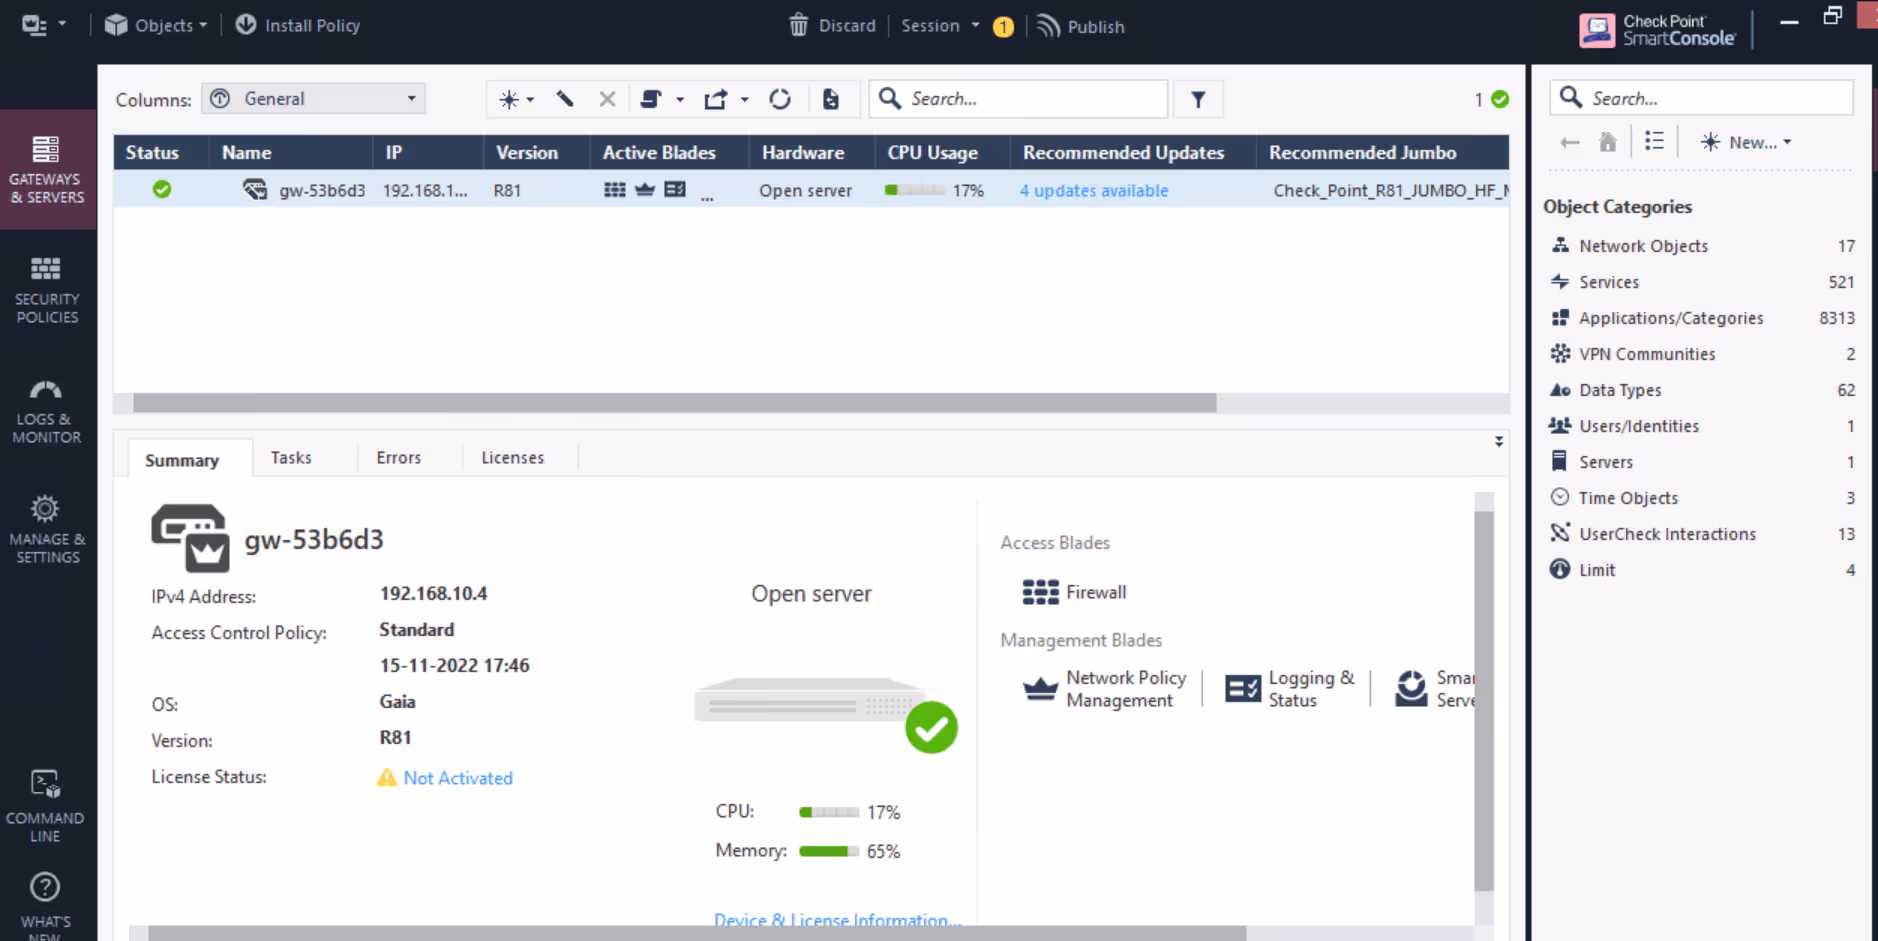
- 2.3. Smart Console Application
- Check Point Server provides SmartConsole Applications which is used to manage Check Point environment.SmartConsole can be used to perform the following functions:
- 2.3.1. Configure Security Policies
- 2.3.2. Monitor products and events
- 2.3.3. Install updates, and so on
- UI makes it easy to manage security for complex networks.
Given below is a screen capture of SmartConsole Application.
3. Creating policies, generating traffic, and capturing Logs
- 3.1. Enable Blades
Check Point offers Multiple Blades which is to enforce security policies and will help an organization to Monitor the incoming/outgoing traffic and Protect from External Attacks.
All the Software Blades can be activated in the Gateway Network Security Settings for which corresponding Security policies will be created. Once Enabled, Changes must be published and installed.
Given below is a screen capture to activate Blades which can be accessed from Check Point Gateway settings.

- 3.2. Creating Security Policies
Security Policies are a collection of rules and settings that control network traffic and Implement company requirement for protection. It provides access to resources with packet inspection.
All policies related to activated blades can be created in Security Policies Tab. Source, Destination, Services, Action, Gateways can be defined in the Rule and assigned to the required Virtual PC.
Check Point solution provides following types of Security Policies:
- 3.2.1. Access Control Policy
- 3.2.2. Threat Prevention Policy
- 3.2.3. HTTPS Inspection Policy
Given below is a screen capture where Security Policies can be configured and installed.

- 3.3. Generate Traffic and Attacks
Traffic can be generated by ICMP, Brute force sample attack, accessing malicious sites, and downloading sample malware files. Associated policy will act as per the action defined in it.
- 3.3.1. Access Control Policy – Check Inbound and Outbound connections in VPC by ICMP, HTTP access
- 3.3.2. Threat Prevention Policy – Accessing Websites and downloading risky file types which is set to be blocked in Policy creation
- 3.3.3. HTTPS Inspection Policy – Access Blocked Applications in VPCs and send unauthorized files from Network
- 3.4. Enable Syslog feature in Check Point server
To Collect the logs, we need to enable Syslog feature in the Check Point server, Logs can be collected in SmartConsole Dashboard by enabling SmartEvent Server and Log Indexing in the Gateway Management Settings.
Check Point can be configured to send logs to Third party Log Management system products like, LogRhythm’s, Graylog, Splunk etc. using Check Point feature – CP Log Exporter.
Log Manager IP address, Input Port number, Log format can be defined in Log Exporter to receive logs in Log Management Dashboard.
Given below is a screen capture to enable SmartEvent Server and SmartEvent Correlation Unit.

3.5. Check Point provides following logs
- 3.5.1. Security – This Blade provides Audit logs, system logs and also Firewall policy related logs
- 3.5.2. Antivirus logs -Protect Computers and remove malicious software or code designed to damage computers or data
- 3.5.3. Application Control – granular policies based on users or groups—to identify, block or limit usage of applications and widgets
- 3.5.4. URL Filtering – controls access to millions of web sites by category, users, groups, and machines to protect users from malicious sites and enable safe use of the Internet
- 3.5.5. Data Loss Prevention – to prevent the exposure of sensitive information outside of an organization, especially regulated data such as personally identifiable information
- 3.5.6. Anti-Malware – Shows scanning detection statistics, top ten infections during the past 30 days and computers that have Anti-Malwareupdates installed
- 3.5.7. IPS – provides complete threat coverage for vulnerabilities in clients, servers, operating systems, and widely available applications such as PDF
- 3.5.8. Threat Emulation – Software Blade on a Security Gateway that monitors the behaviour of files in a sandbox to determine whether they are malicious
4.1. Understanding and analysing raw logs
- 4.1.1. Raw logs are sent to SIEM Input from the Product Setup
- 4.1.2. Research and understand product’s official log documents
- 4.1.3. Segregate logs based on event_type or msg_id or event_description fields in the raw message
- 4.1.4. Following Image is for Sample Threat Log in RAW format for Symantec Endpoint Protection Product
4.2. Log Management Parsing Flow
Log Management Input
Configuration file (toml)
Workflow Sequence
Logs parsing and Source Mapping

- 4.2.1. Log Management Input can be created with Title and Port Number which will be configured in Product setup
- 4.2.2. “toml” file is created with ID, Title, and description to route the logs into the Workflow sequence
- 4.2.3. Workflow dictate the execution of Parsing Rules (GROK, Regex pattern and Source Mapping) to parse the logs
- 4.2.4. Here is the basic syntax format of grok filter: % {SYNTAX: SEMANTIC} or % {PATTERN: Fieldname}
- 4.2.5. Grok Debugger and Regex101 tools are used to validate that the patterns are efficient
4.3. Source Mapping
- 4.3.1. Once Fields are Extracted and in readable format, Source mapping is done to map Field names to Common Field name
- 4.3.2. Field name with src_ip will be renamed to source_ip so the log message can be understood by the end user
- 4.3.3. Field names will be allocated to values which do not have keys (field names) assigned to it
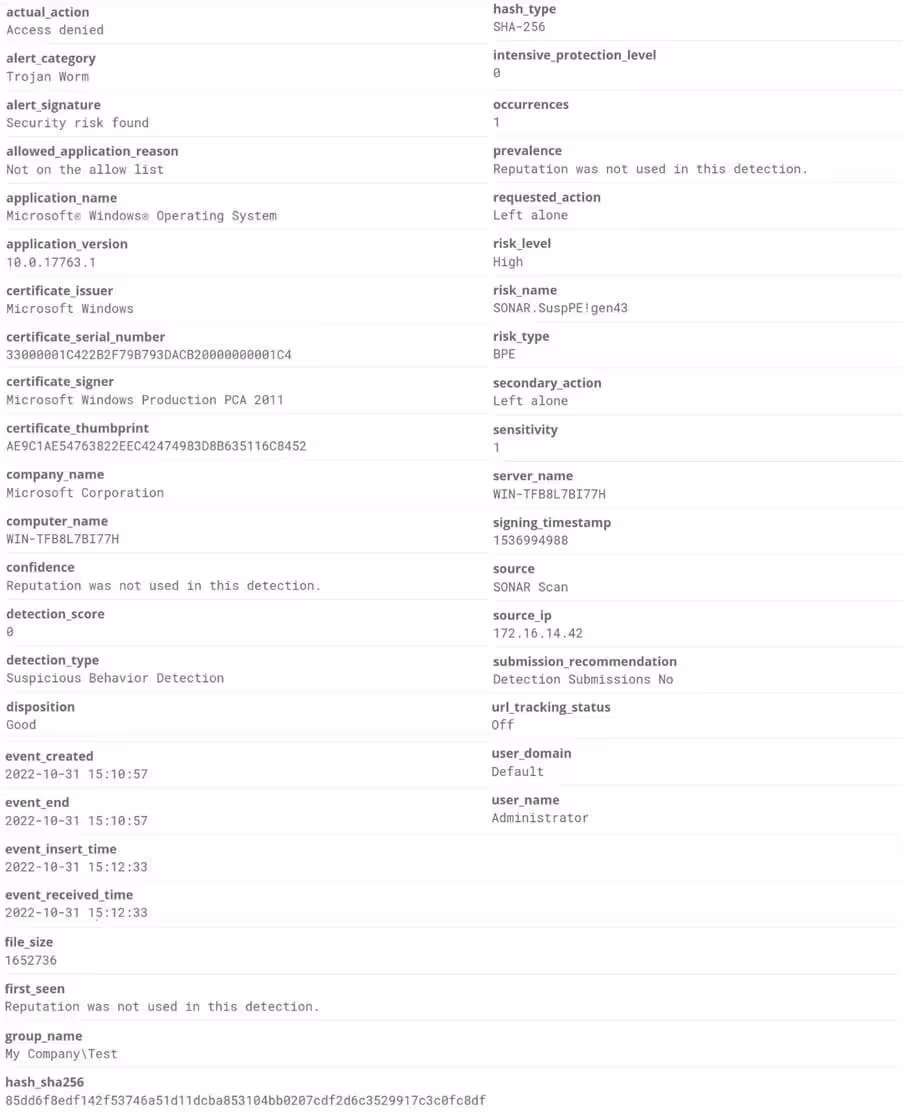
Given below is RAW Threat Log Message which is sent from Firewall to Log Management System.The Fields that are Highlighted in below Image are mapped into common field names of the target Log Management System.
Given below is an image how Logs would be after Parsing and Source mapping is completed which helps in analysing the traffic captured by Check Point.
About Loginsoft
For over 20 years, leading companies in Telecom, Cybersecurity, Healthcare, Banking, New Media, and more have come to rely on Loginsoft as a trusted resource for technology talent. From startups, to product and enterprises rely on our services. Whether Onsite, Offsite, or Offshore, we deliver. With a track record of successful partnerships with leading technology companies globally, and specifically in the past 6 years with Cybersecurity product companies, Loginsoft offers a comprehensive range of security offerings, including Software Supply Chain, Vulnerability Management, Threat Intelligence, Cloud Security, Cybersecurity Platform Integrations, creating content packs for Cloud SIEM, Logs onboarding and more. Our commitment to innovation and expertise has positioned us as a trusted player in the cybersecurity space. Loginsoft continues to provide traditional IT services which include Software development & Support, QA automation, Data Science & AI, etc.
Expertise in Integrations with Threat Intelligence and Security Products: Built more than 250+ integrations with leading TIP, SIEM, SOAR, and Ticketing Platforms such as Cortex XSOAR, Anomali, ThreatQ, Splunk, IBM QRadar & Resilient, Microsoft Azure Sentinel, ServiceNow, Swimlane, Siemplify, MISP, Maltego, Cryptocurrency Digital Exchange Platforms, CISCO, Datadog, Symantec, Carbonblack, F5, Fortinet, and so on. Loginsoft is a partner with industry leading technology vendors Palo Alto, Splunk, Elastic, IBM Security, etc.
In addition, Loginsoft offers Research as a service: We're more than just experts in cybersecurity; we're your accredited in-house research team focused on unraveling the complexities of cybersecurity and future technologies. From Application Security to Threat Research, our seasoned professionals have cultivated expertise in every facet of the field. We've earned the trust of over 20 security platform companies, who count on our research and analysis to strengthen their cybersecurity solutions.
Interested to learn more? Let’s start a conversation.